본문
Android Weekly #319
Android Weekly #319
Animations with MotionLayout
- 뛰어난 유연성 때문에 ConstraintLayout이 많이 쓰이게 되었지만, complex animations가 포함된 contents는 아직도 어렵고 시간도 많이 잡아먹는다.
- 이러한 이유로 Google 2018 I/O에서 MotionLayout을 발표했다.
- Android support library의 일부로, ConstraintLayout extends 이다.
- XML을 사용해서 contents declaratively animate로 만들 수 있는 unique widget이다.
- 또한 모든 animations를 fine-grained control 가능하다.
Prerequisites
- Android studio 3.1.3 or higher
- Android API level 21 or higher
- basic understanding ConstraintLayout widget
Add Dependencies
- 위에서 눈치챘겠지만 latest version의 Constraint layout support library가 implementation 되어야 한다.
- avoid version conflicts를 위해 v7 appcompat support library도 포함시키는게 좋다.
implementation 'com.android.support:appcompat-v7:27.0.2'implementation 'com.android.support.constraint:constraint-layout:2.0.0-alpha1' |
Define a Layout
- ConstraintLayout이 할 수 있는건 뭐든 가능
- widget에서 사용할 수 있는 attribute도 전부 사용 가능
<ImageView android:id="@+id/actor" app:srcCompat="@color/colorAccent" android:layout_width="wrap_content" android:layout_height="wrap_content" />Create a Motion Scene
- ImageView에 constraint를 추가하는것이 아니라, motion scene에 추가한다.
<?xml version="1.0" encoding="utf-8"?><MotionScene <!-- More code here --> </MotionScene>- motion scene은 ConstraintSet을 포함한다.
- 보통 2개의 constraint set을 포함하는데, start and end이다.
- ex) right bottom -> left top
<ConstraintSet android:id="@+id/starting_set"> <Constraint android:id="@+id/actor" app:layout_constraintBottom_toBottomOf="parent" app:layout_constraintRight_toRightOf="parent" android:layout_width="60dp" android:layout_height="60dp" /></ConstraintSet><ConstraintSet android:id="@+id/ending_set"> <Constraint android:id="@+id/actor" app:layout_constraintTop_toTopOf="parent" app:layout_constraintLeft_toLeftOf="parent" android:layout_width="60dp" android:layout_height="60dp" /></ConstraintSet>- (와 미친 정말 혜자 아니냐)
- 각 ConstraintSet element는 반드시 '위치' 와 '크기' 를 지정해야 한다.(이전에 설정된 layout 정보를 덮어쓰게 되므로 중요하다.)
- 실행 순서를 위해서 Transition을 설정해야 한다.
- constraintSetStart, constraintSetEnd
<Transition android:id="@+id/my_transition" app:constraintSetStart="@+id/starting_set" app:constraintSetEnd="@+id/ending_set" app:duration="2000"> </Transition>- 자 이제 MotionLayout에 laytoutDescription attribute에 요걸 넣자.
<android.support.constraint.motion.MotionLayout android:layout_width="match_parent" android:layout_height="match_parent" app:layoutDescription="@xml/my_scene" android:id="@+id/motion_container"> ...</android.support.constraint.motion.MotionLayout>Start the Animation
- app을 실행하면 MotionLayout widget은 Transition element의 constraintSetStart set을 자동으로 적용
- 따라서, animation을 실행하려면 다음 method만 호출하면 된다.
1 | motion_container.transitionToEnd() |
- 이건 좀 animation trigger 방식이 이상하다. 논리적으로 constraintSetStart가 자동으로 set된다고 하더라도 trigging하는 method가 따로 있어야지, 이런식으로 call을...(이름 겁나 거슬려) (진짜 이렇게 쓰는거야?)

Handle Animation Events
- MotionLayout에 TransitionListener를 붙일 수 있다.
motion_container.setTransitionListener( object: MotionLayout.TransitionListener { // More code here })- onTransitionCompleted()는 constraint set -> other constraint set 전환이 완료 되었을 때 호출
- onTransitionChainge()는 animation prgress가 바뀔 때마다 call
- progress는 0~1 floating point
Create Key Frames
- 중간에 몇개의 point를 더 만드려면 new key frames를 더 만들어야 한다.
- Transition element에 KeyFrameSet element를 추가
1 2 3 | <KeyFrameSet android:id="@+id/my_keys"> <!-- More code here --></KeyFrameSet> |
- 다양한 key frame이 있으므로 적절하게 골라 쓰면 된다.
01 02 03 04 05 06 07 08 09 10 11 | <KeyPosition app:target="@+id/actor" app:framePosition="30" app:type="deltaRelative" app:percentX="0.85" /> <KeyPosition app:target="@+id/actor" app:framePosition="60" app:type="deltaRelative" app:percentX="1" /> |

<KeyCycle app:target="@+id/actor" app:framePosition="30" android:rotation="50" app:waveShape="sin" app:wavePeriod="1" />
Make Animated Widgets Interactive
- 다음 OnClick, OnSwipe element를 Transition에 추가해서 animation을 실행 가능
<OnClick app:target="@+id/actor" app:mode="transitionToEnd"/><OnSwipe app:touchAnchorId="@+id/actor" app:touchAnchorSide="top" app:dragDirection="dragUp" />
- 출처 : https://code.tutsplus.com/tutorials/creating-animations-with-motionlayout-for-android--cms-31497
- 공식문서 : https://developer.android.com/reference/android/support/constraint/motion/MotionLayout
When is "When" exhaustive?
- kotlin's when은 java's switch와 비슷
- when이 모든 branches(enum, sealed class..)를 처리 가능하다고 들었지만, 저자는 그렇게 생각하지 않는다.
- IDE는 when을 쓸 때, warnning한다. : "when" block with hints to add "else" branch or add remaining branches
- Documentation을 보면,
>If [`when`] is used as an expression, the value of the satisfied branch becomes the value of the overall expression [... and] the `else` branch is mandatory, unless the compiler can prove that all possible cases are covered with branch conditions
- 그래서 expression으로 쓰면 compiler error를 낸다.

- 때로는 expression으로 사용하고 싶지 않지만, 모든 경우를 explicitly 처리하려고 한다.
void onNext(Result result) {
    switch (result.type) {
        case COMPLETE:
            show(result.data)
            break;
        case LOADING:
            showLoading()
        case ERROR:
            showError(result.error)
            break;
        default:
            throw new IllegalArgumentException("unknown result type: " + result);
    }
}
- switch 문을 사용했을 경우, result.type이 변경되면, will crash! -> unexpected behaviour보다 낫다.
- when을 사용하면 default 대신 else가 사용되기 때문에, exception이 그대로 발생한다.
- 이를 empty let block을 사용한 when expression 으로 처리하면 compile-time check로 만들 수 있다.

- 이건 cool해 보이지 않고, 나중에 누군가 (또는 내가) 아무것도 하지않는다고 판단한 .let {} 을 지울것이다.
-> add extension으로 깔끔하게 정의하자
val <T> T.exhaustive: T
    get() = this
출처 : https://proandroiddev.com/til-when-is-when-exhaustive-31d69f630a8b
Android Studio - Taming the interface
⌥ + number: open/close views⇧ + ⌘ + ↑: enlarge view⇧ + ⌘ + ↓: shrink view⇧ + ⌘ + →: enlarge side view⇧ + ⌘ + ←: shrink side view⇧ + ⌘ + F12: close all views⇧ + ⌘ + ]: next tab⇧ + ⌘ + [: previous tab^ + ⇧ + →: text view (xml layout editing)^ + ⇧ + ←: design view (visual layout editing)⌥ + letter: invoke button⌘ + ⇧ + A: action lookup
Taming the interface
- ⌥ + number
- ⇧ + ⌘ + ↑ and ⇧ + ⌘ + ↓
- ⇧ + ⌘ + → and ⇧ + ⌘ + ← or ⇧ + ⌘ + F12
- ⇧ + ⌘ + [ and ⇧ + ⌘ + ]
![Use `⧠+ â + [` and `⧠+ â + ]` to cycle between tabs](https://jeroenmols.com/img/blog/androidstudioshortcuts3/changetabs.gif)
- ^ + ⇧ + → and ^ + ⇧ + ←
- dialog가 열리면 ⌥ 키를 눌러 언제든지 respective button을 invoke 가능


- ⌘ + ⇧ + A
- 출처 : https://jeroenmols.com/blog/2018/07/16/androidstudioshortcuts3/
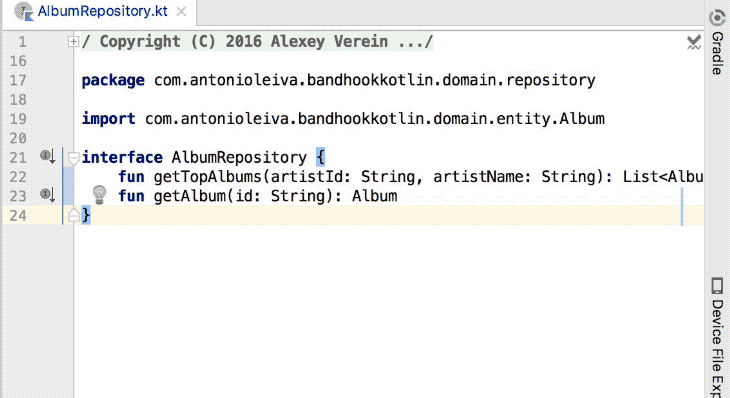
Cloud Continuous Integration on Android with Kotlin Project
- Continuous Integration은 정말 짱난다.
- 여기서 project에서 continuous integration을 perform하는 방법을 공유하려고 한다.
The project we will work on
- MVVM project
- test를 추가하고 제대로 동작하는지 확인
- code coverage report 추가
- README.md에 continuous integration 상황을 display 하자
Add Continuous Integration
- Circle CI, Travis 등 많은 cloud continuous integration service가 있다.
- Travis CI 를 선택했다.
-> 우리도 모빌이 있는데 Travis와 비교해서 어떤가?
- root project에 .travis.yml file만 add하면 된다.
language: android
android:
  components:
    - android-28
    - build-tools-27.0.3

env:
  global:
   # install timeout in minutes (2 minutes by default)
    - ADB_INSTALL_TIMEOUT=8

# Run assemble and unit tests
script:
  - ./gradlew clean assembleDebug assembleRelease testDebug
- clean
반드시 필요한건 아니지만, gradle build 전에 cleaning하는건 좋은 습관이다.
- assembleDebug
compiled debug mode
- assembleRelease
compiled release mode
- testDebug
debug모드에서 unit test가 성공적인지 확인
Add Code Coverage Report
- 저자는 Codecov.io를 선택했다.
- travis와 마찬가지로 세상에 공짜는 없다.
Implement code coverage with JaCoCo
- 사실 CodeCov가 커버리지 측정을 해주는건 아니다.
- JaCoCo를 implement하여 project의 code coverage report를 작성할거다.
- Travis에게 code coverage report를 생성하도록 요청할것이다.
- Travis는 send report to CodeCov
buildscript {
  repositories {
    ...
    jcenter()
  }
  dependencies {
    ...
    classpath 'com.dicedmelon.gradle:jacoco-android:0.1.2'
  }
}
// ... apply plugin: 'jacoco-android' // ...
- run ./gradlew jacocoTestReport
- JaCoCo는 생성된 classes에 대해서 test performs
- JaCoCo not include our code files (because 얘네는 java code 대신 kotlin code가 있어서)

- JaCoCo behavior costomize가 필요하다.
project.afterEvaluate {
    //Gather build type and product flavor names in a list
    def buildTypes = android.buildTypes.collect { type -> type.name }
    def productFlavors = android.productFlavors.collect { flavor -> flavor.name }
    if (!productFlavors) productFlavors.add('')

    productFlavors.each { productFlavorName ->
        buildTypes.each { buildTypeName ->

            //Define the sourceName and the sourcePath.
            def sourceName, sourcePath
            if (!productFlavorName) {
                sourceName = sourcePath = "${buildTypeName}"
            } else {
                sourceName = "${productFlavorName}${buildTypeName.capitalize()}"
                sourcePath = "${productFlavorName}/${buildTypeName}"
            }

            def testTaskName = "test${sourceName.capitalize()}UnitTest"

            task "create${sourceName.capitalize()}UnitTestCoverageReport"(type: JacocoReport, dependsOn: "$testTaskName") {

                group = "Reporting"
                description =
                        "Generate Jacoco coverage reports on the ${sourceName.capitalize()} build."

                reports {
                    xml.enabled true
                    html.enabled true
                }

                //Directory where the compiled class files are
                classDirectories =
                        fileTree(dir: "${project.buildDir}/intermediates/classes/${sourcePath}",
                                excludes: ['**/R.class',
                                           '**/BR.class',
                                           '**/R$*.class',
                                           '**/*$ViewInjector*.*',
                                           '**/*$ViewBinder*.*',
                                           '**/BuildConfig.*',
                                           'android/**',
                                           '**/Manifest*.*',
                                           '**/*$Lambda$*.*', // Jacoco can not handle several "$" in class name.
                                           '**/*Module.*', // Modules for Dagger.
                                           '**/*Dagger*.*', // Dagger auto-generated code.
                                           '**/*MembersInjector*.*', // Dagger auto-generated code.
                                           '**/*_Provide*Factory*.*',
                                           '**/*_Factory.*', //Dagger auto-generated code
                                           '**/*$*$*.*' // Anonymous classes generated by kotlin
                                ])

                sourceDirectories = files(["src/main/java",
                                           "src/$productFlavorName/java",
                                           "src/$buildTypeName/java"])

                executionData = files("${project.buildDir}/jacoco/${testTaskName}.exec")
            }
        }
    }
}
- 조금씩 해보자. java 대신 kotlin folder를 사용하기 위해서 sourceDirectories를 교체할 수 있다.
sourceDirectories = files(["src/main/kotlin",
                           "src/$productFlavorName/kotlin",
                           "src/$buildTypeName/kotlin"])
- 또한 kotlin.class files이 같은 폴더에 생성되지 않으므로 classDirectories 값을 변경해야 한다.
fileTree(dir: "${project.buildDir}/tmp/kotlin-classes/${sourcePath}",
   // ...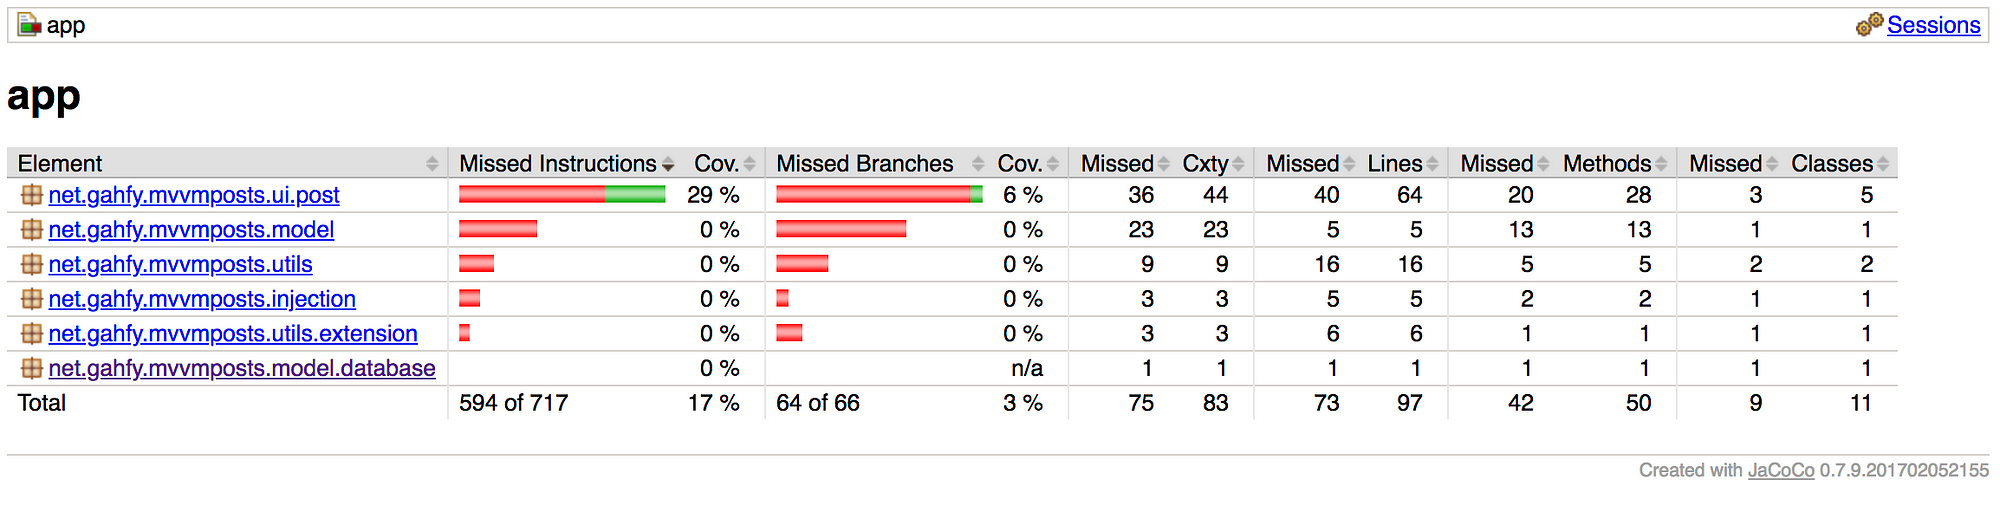
code coverage의 main goal은 coverage percentage가 일정 수준 이하로 떨어지는 시점을 detect하고 무언가 잘못되었음을 know할 수 있다는 것이다.
- unit test에서 제외시키고 싶은 classes들도 따로 지정할 수 있다.
excludes: ['**/R.class',
           '**/BR.class',
           // Remove Activity and application as they are dependent to Context
           '**/*Activity.class',
           '**/net/gahfy/mvvmposts/injection/ViewModelFactory.class',
           // Remove View Utils
           '**/net/gahfy/mvvmposts/utils/extension/ViewExtension.class',
           '**/net/gahfy/mvvmposts/utils/BindingAdapters.class',
           // ...
Edit .travis.yml
language: android
android:
components:
- android-28
- build-tools-27.0.3
env:
global:
# install timeout in minutes (2 minutes by default)
- ADB_INSTALL_TIMEOUT=8
# Run assemble, unit tests, and create coverage report
script:
- ./gradlew clean assembleDebug assembleRelease testDebug createDebugUnitTestCoverageReport
# Renaming folder and files of reports so codecov.io can find it
- mv app/build/reports/jacoco/createDebugUnitTestCoverageReport app/build/reports/jacoco/jacocoTestDebugUnitTestReport
- mv app/build/reports/jacoco/jacocoTestDebugUnitTestReport/createDebugUnitTestCoverageReport.xml app/build/reports/jacoco/jacocoTestDebugUnitTestReport/jacocoTestDebugUnitTestReport.xml
# Codecov.io
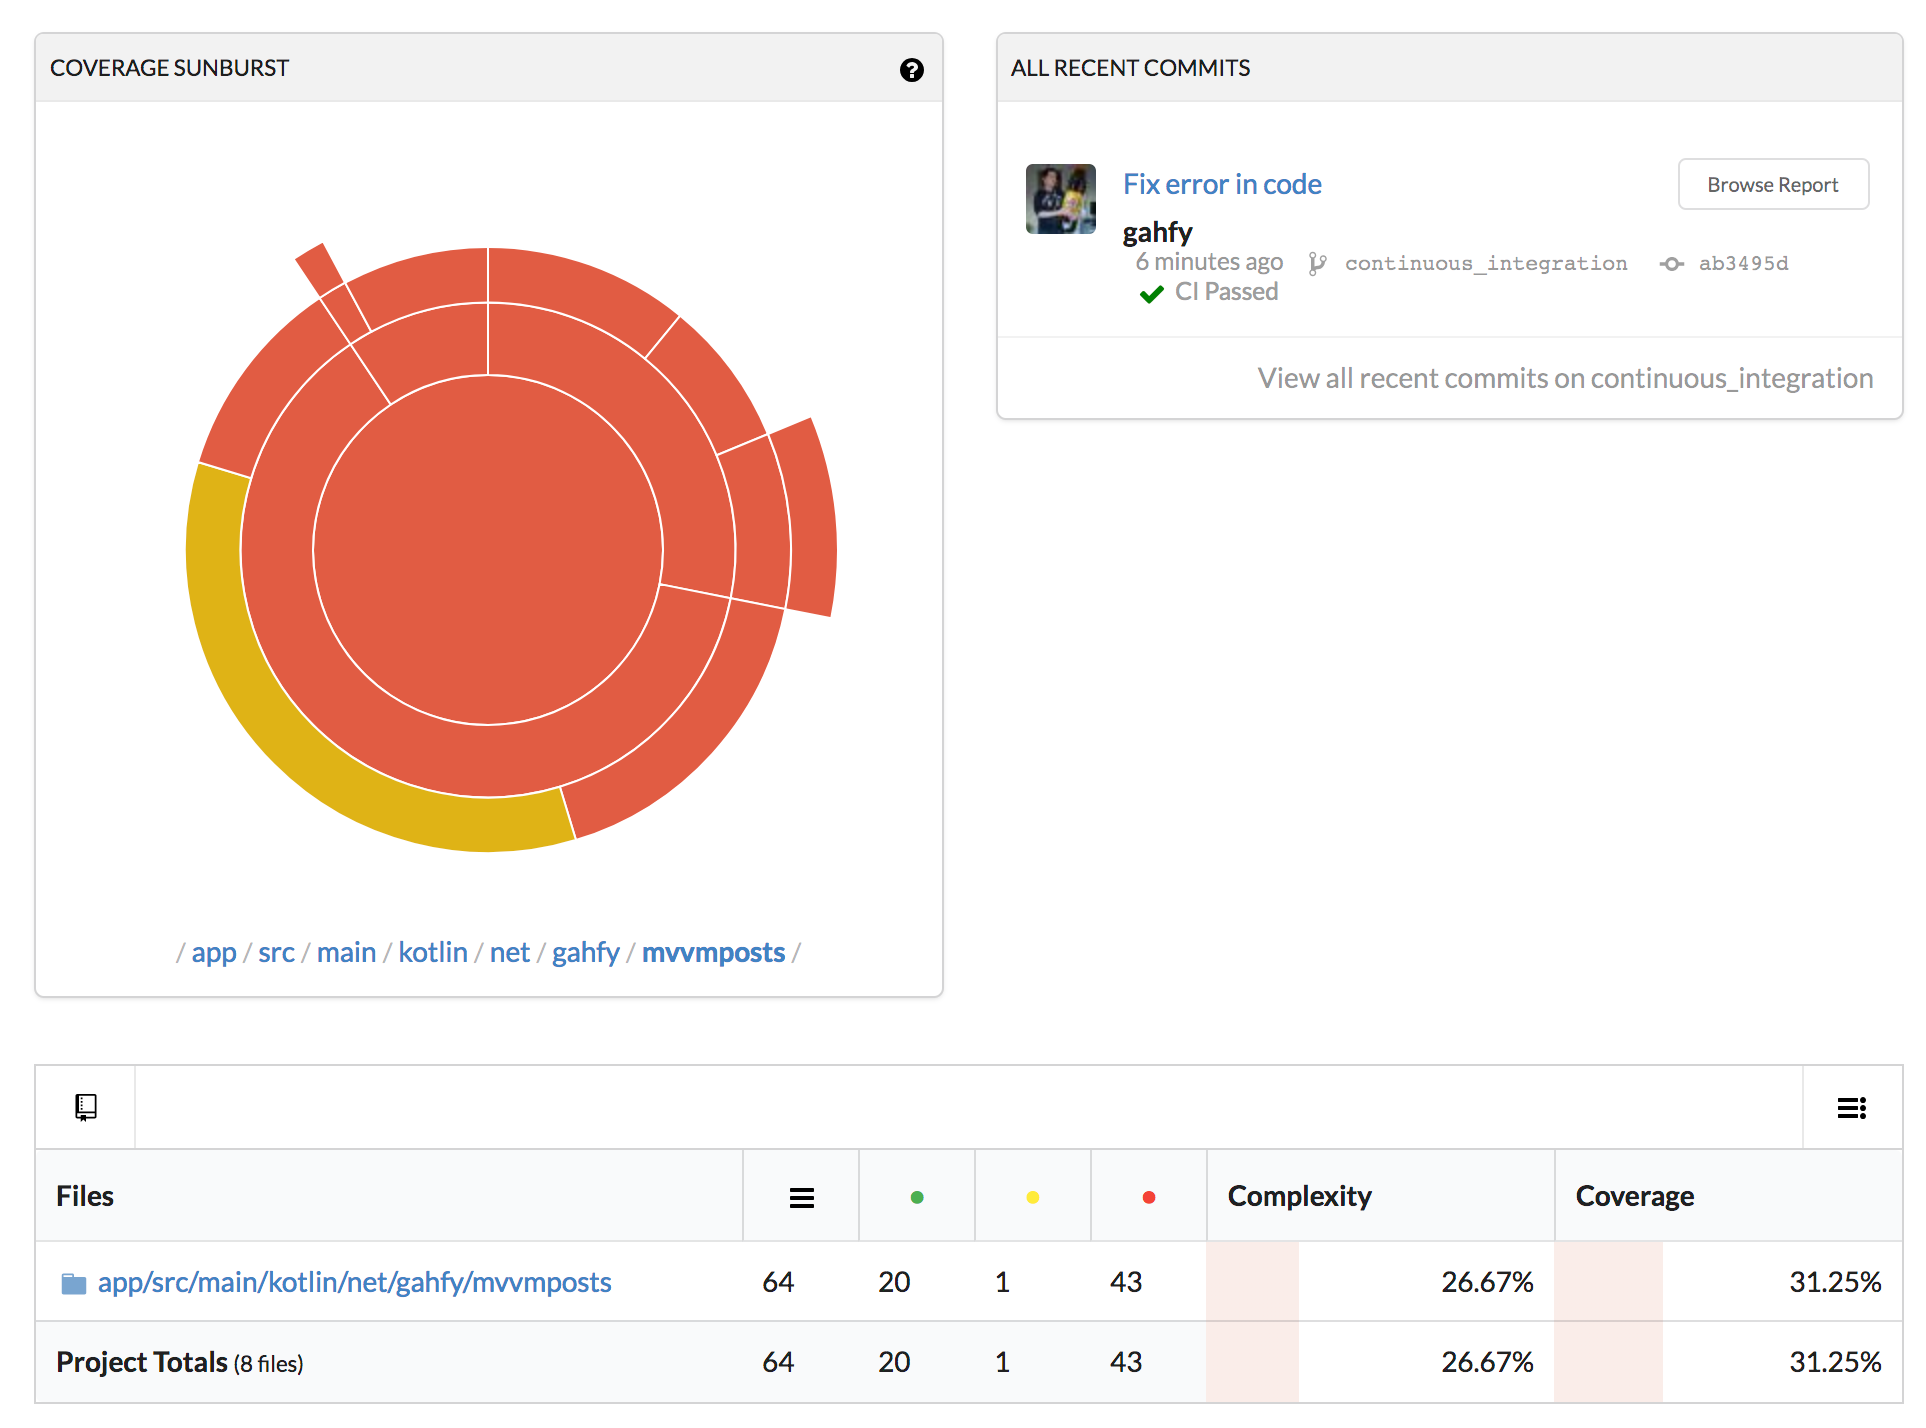
- bash <(curl -s https://codecov.io/bash)- 이제 commit and push를 하면 codecov report를 확인가능하다.
What about code quality
- 저자는 SonarQube를 좋아하지만 kotlin plugin은 SonarCloud에 아직 포함되지 않았다.
- 이러한 이유로 SonarCloud intergration을 추가하는건 의미가 없는 짓이다.
- 하지만 난 포기하지 않았찌!
And now what?
- Pull requests
code coverage decrease와 관련된 문제가 있으면 CodeCov가 알려준다.
- Badges
ㅋㅋㅋㅋㅋㅋㅋㅋㅋㅋㅋㅋㅋㅋㅋㅋㅋㅋㅋㅋㅋㅋㅋㅋㅋㅋㅋㅋㅋㅋㅋㅋㅋㅋㅋㅋㅋㅋㅋㅋㅋㅋㅋㅋㅋㅋㅋㅋㅋㅋㅋㅋㅋㅋㅋㅋㅋㅋㅋㅋㅋㅋㅋㅋㅋㅋㅋㅋㅋㅋㅋㅋㅋㅋㅋㅋㅋㅋㅋㅋㅋㅋㅋㅋㅋㅋㅋ
- 강력한 뱃지 추가 기능이 있다.
[](https://travis-ci.org/[github_login]/[github_repo])
[](https://codecov.io/gh/[github_login]/[github_repo])
[](https://travis-ci.org/gahfy/MVVMPosts) [](https://codecov.io/gh/gahfy/MVVMPosts)
댓글